Saturday, February 2, 2013
Monday, November 14, 2011
Sunday, October 16, 2011
SOTHOURN: How to Create a Nice Emoticons Icon Set
SOTHOURN: How to Create a Nice Emoticons Icon Set: Details Program : Adobe Illustrator CS5 Difficulty : Intermediate ...
How to Create a Nice Emoticons Icon Set
- Program: Adobe Illustrator CS5
- Difficulty: Intermediate
- Estimated Completion Time: 1 hour and 30 minutes
Final Product What You'll Be Creating
Step 1
Create a 60px by 60px, RGB document. First, turn on the Grid (View > Grid) and the Snap to Grid (View > Snap to Grid). Next, you’ll need a grid every 1px. Go to Edit > Preferences > Guides & Grid, enter 1 in the Gridline every box and 1 in the Subdivisions box.You can also open the Info panel (Window > Info) for a live preview with the size and position of your shapes. Do not forget to replace the unit of measurement to pixels from Edit > Preferences > Unit > General. All these options will significantly increase your work speed.
Step 2
Pick the Ellipse Tool(L), create a 40 by 40px shape and fill it with R=255, G=222, B=23.Step 3
Select the shape created in the previous step and make sure that it’s placed in the middle of your artboard. Enable the Rulers (Command + R) and the Guides (View > Guides > Show Guides), then drag a vertical and a horizontal guide as shown in the following image. Disable the Rulers and keep the guides visible. It will help in the following steps, as you add some new shapes.Step 4
Disable the Snap to Grid, then go to Edit > Preferences > General and enter 0.5 in the Keyboard Increment box. Reselect the yellow circle and make two copies in front (Command + C > Command + F > Command + F). Select the top copy and hit the down arrow once (to move it 0.5px down). Reselect both copies and click on the Minus Front button from the Pathfinder panel. Fill the resulting shape with white.Step 5
Re-enable the Snap to Grid. Reselect the yellow circle and go to the Appearance panel. Select the existing fill and click on the Duplicate Selected Item button located in the bottom of the Appearance panel. Obviously, this will create a copy of the selected fill. Select this new fill, lower its Opacity to 75% and fill it with the linear gradient shown in the following image.Pay attention to the gradient image. The yellow "0" stands for opacity percentage. This means that you need to select the gradient slider and lower its opacity to 0%. Keep focusing on this yellow circle. Reselect it and add a simple stroke. Make it 1pt wide, align it to outside and set its color to R=237, G=147, B=39.
Step 6
Reselect the shape edited in the previous step. Go to the Appearance panel, select the yellow fill and go to Effect Stylize > Inner Glow. Enter the data shown below, click OK, then go to Effect > Stylize > Drop Shadow. Again, enter the data shown below and click OK. In the end your shape should look like the following image. This will be the face shape that you will use for most of the emoticons.Step 7
Now, let’s add a mood for this face. First, re-enable the Snap to Grid, then select the Rectangle Tool (M). Create two 4 by 8px shapes and a 12 by 8px shape, then place them as shown.The Snap to Grid and the Guides will ease your work. Fill them all with R=96, G=57, B=19, then go to Effect > Stylize > Rounded Corners. Enter a 2px radius, click OK, then go to Effect > Stylize > Drop Shadow. Enter the data shown below and click OK.
Step 8
Pick the Ellipse Tool (L), create a 26 by 16px shape and place it as shown. Fill it with the linear gradient shown below, then lower its Opacity to 50%. Now, let’s organize the existing shapes.Go to the Layers panel, select the existing layer and click on the Create New Sublayer button from the bottom of the Layers panel. Select all the shapes created so far and move them inside this new sublayer. Double-click on this sublayer and name it "Not Amused." Now your first emoticon is complete.
Step 9
Select the sublayer created in the previous step and make a copy in front. Focus on this new sublayer, select the mouth shape and go to Effect > Warp > Arc. Enter the data shown below image #1 and click OK.Name this second sublayer "Sad" and duplicate it. Select the mouth shape from this new sublayer, then go to the Appearance panel and open the existing Warp effect. Drag the Bend slider to -50%, then click OK. Name this third sublayer "Happy."
Step 10
Select the "Happy" sublayer and make a copy in front. Let’s focus on this fresh sublayer. First, rename it "Grin," then select the exiting mouth shape and delete it. Pick the Ellipse Tool (L), create a 16 by 7px shape and place it as shown in the first image. Fill it with R=96, G=57, B=19. Then go to Effect > Warp > Arch. Enter the data shown below, click OK, then go to Object > Expand Appearance.Select the resulting shape and make two copies in front, then disable the Snap to Grid. Select the top copy and hit the down arrow four times, then reselect both copies and click on the Minus Front button from the Pathfinder panel. Fill the resulting shape with white.
Step 11
Re-enable the Snap to Grid. Pick the Pen Tool (P), draw three vertical paths and place then as shown in the first image. Add a 1pt stroke for these paths and set its color at R=39, G=170, B=225.Group them (Command + G). Select the white shape created in the previous step, make a copy and bring it to front (Shift > Command + Right Bracket key). Select this fresh, white shape along with the fresh group and go to the Transparency panel. Open the fly-out menu and click on Make Opacity Mask.
Step 12
Reselect the mouth shape and go to Effect > Stylize > Drop Shadow. Enter the data shown below, click OK, then add a 1pt stroke. Align it to outside and set its color at R=237, G=147, B=39.Step 13
Select the "Grin" sublayer and make a copy in front. Let’s focus on this fresh sublayer. First, rename it "Winking," then select the right eye shape and delete it. Pick the Rectangle Tool (M), create a 5 by 3px shape and place it as shown.Fill it with R=96, G=57, B=19. Then go to Effect > Stylize > Rounded Corners. Enter a 2px radius, click OK, then go to Effect > Warp > Arc. Enter the data shown below, click OK, then go to Effect > Stylize > Drop Shadow. Again, enter the data shown below then click OK.
Step 14
Select the "Winking" sublayer and make a copy in front. Let’s focus on this fresh sublayer. First, rename it "Weeping," then select the eyes and the mouth components and delete them. Pick the Rectangle Tool (M), create two 6 by 4px shapes and place them as shown in the following image. Fill them with with R=96, G=57, B=19. Then go to Effect > Stylize > Rounded Corners. Enter a 2px radius, click OK, then go to Effect > Warp > Arc. Enter the data shown below, click OK then go to Object > Expand Appearance.Select the left eye shape and go to Object > Transform > Rotate. Enter a 45 degrees angle, then click OK. Select the right eye shape and go to Object > Transform > Rotate. Enter a -45 degrees angle, then click OK. Reselect both eye shapes and go to Effect > Stylize > Drop Shadow. Enter the data shown in the final image, then click OK.
Step 15
Keep focusing on the "Weeping" sublayer. Pick the Ellipse Tool (L), create a 16 by 7px shape, and place it as shown. Fill it with R=96, G=57, B=19, and go to Effect > Warp > Arch. Enter the data shown below, click OK, then go to Object > Expand Appearance.Select the resulting shape, make two copies in front, and disable the Snap to Grid. Select the top copy and hit the up arrow ten times. Reselect both copies and click on the Intersect button from the Pathfinder panel. Fill the resulting shape with white.
Step 16
Re-enable the Snap to Grid. Pick the Pen Tool (P), draw three vertical paths and place then as shown in the first image. Add a 1pt stroke for these paths and set its color at R=39, G=170, B=225. Group them (Command + G). Select the white shape created in the previous step, make a copy and bring it to front (Shift > Command + Right Bracket key). Select this fresh, white shape along with the fresh group and go to the Transparency panel. Open the fly-out menu and click on Make Opacity Mask.Step 17
Reselect the mouth shape and go to Effect > Stylize > Drop Shadow. Enter the data shown below, click OK, then add a 1pt stroke. Align it to outside and set its color to R=237, G=147, B=39.Step 18
Pick the Ellipse Tool (L), create a 4 by 4px shape, and fill it with R=39, G=170, B=255. Pick the Convert Anchor Point Tool (Shift + C) and click on the bottom anchor point. This will make your circle look like in the second image. Pick the Direct Selection Tool (A), select the bottom anchor point, and move it 2px down. Now, focus on the left and right anchor points. Use the same tool to drag the handles 1px down.Step 19
Select the shape created in the previous step and go to Effect > Warp > Arc. Enter the data shown below, click OK, then go to Object > Expand Appearance. Duplicate the resulting shape. Rotate these two, blue shapes, and place them as shown. Finally, add a 0.5pt stroke for both of these shapes. Align it to inside and set its color to R=28, G=117, B=188.Step 20
Select the "Happy" sublayer, make a copy, and move it to the top of the Layer panel. Let’s focus on this fresh sublayer. First, rename it "Love," then select eye shapes and delete them. Go to the Symbols panel (Window > Symbols), open the fly-out menu, and go to Open Symbol Library > Web Icons. A window with a set of symbols should open.Select the "Favorite"symbol, drag it onto your artboard, then go to Object > Expand. Focus on the resulting shape. First, pick the Direct Selection Tool (A), select the anchor points highlighted in the second image, and hit the Delete button. Now, the heart should look like the third image.
Next, you need to add a discrete roundness effect for the bottom anchor point. You’ll need the Round Any Corner Script. Save it to your hard drive, select the bottom anchor point using the Direct Selection Tool (A), then go to File > Scripts > Other Script. Open the Round Any Corner Script, enter a 7px Radius and click OK. Fill the resulting shape with R=242, G=41, B=17. In the end it should look like the fourth image.
Step 21
Select the shape made in the previous step and duplicate it. Select these two heart shapes, resize them, and place them as shown. Now go to Effect > Stylize > Drop Shadow. Enter the data shown below, click OK, then add a 0.75pt stroke. Align it to inside and set its color to R=190, G=30, B=45.Step 22
Select the "Love" sublayer and make a copy in front. Let’s focus on this fresh sublayer. First, rename it "Surprise," then select eye and the mouth components and delete them. Pick the Rectangle Tool (M), create a 10 by 5px shape, and place it as shown in the following image. Fill it with R=96, G=57, B=19. Then go to Effect > Stylize > Rounded Corners. Enter a 3px radius, click OK, then go to Effect > Stylize > Drop Shadow. Enter the data shown below and click OK.Step 23
Pick the Ellipse Tool (L), create two 8 by 8px shapes, and place them as shown in the first image. Fill them with R=241, G=242, B=242 and add a 1pt stroke. Align it to outside and set its color at R=237, G=147, B=39.Reselect both circles and go to Effect > Stylize > Drop Shadow. Enter the data shown in the first image and click OK. Again, pick the Ellipse Tool (L) and create two 2 by 2px shapes. Fill them with R=96, G=57, B=19, and place them as shown in the second image.
Step 24
Pick the Pen Tool (P), draw two vertical paths (6px tall) and place them as shown in the following image. Add a 1pt stroke for both of these paths, set the color at R=237, G=147, B=39, and go to the Stroke panel (Window > Stroke).Click on the Round Cap button, then go to Effect > Stylize > Drop Shadow. Enter the data shown below, click OK, then select only the left path. Go to Effect > Warp > Arc, enter the data shown below, click OK, then select the right path. Again, go to Effect > Warp > Arc, enter the data shown below, then click OK.
Step 25
Select the "Love" sublayer, make a copy, and move it in the top of the Layers panel. Let’s focus on this fresh sublayer. First, rename it "Blushing," then select eye components, and delete them. Pick the Rectangle Tool (M), create two 4 by 6px shapes, and place them as shown in the following image. Fill them with R=96, G=57, B=19, then go to Effect > Stylize > Rounded Corners. Enter a 2px radius, click OK, then go to Effect > Stylize > Drop Shadow. Enter the data shown below and click OK.Step 26
Pick the Pen Tool (P), draw two horizontal paths (4px long), and place them as shown in the following image. Add a 1pt stroke for both of these paths, set the color at R=96, G=57, B=19, and go to the Stroke panel. Click on the Round Cap button, then go to Effect > Stylize > Drop Shadow. Enter the data shown below, click OK, then go to Effect > Warp > Arc. Again, enter the data shown below and click OK.Step 27
Pick the Ellipse Tool (L), create two 5 by 5px shapes, and place them as shown. Fill them with R=237, G=28, B=36, and go to Effect > Blur > Gaussian Blur. Enter a 2px radius and click OK.Step 28
Select the "Blushing" sublayer and make a copy in front. Let’s focus on this fresh sublayer. First, rename it "Sick," then delete the eyes and the mouth components. Now, you need to change the color of the entire face.Go to the Appearance panel and focus on the first fill. Replace the yellow with R=171, G=223, B=35, then open the Inner Glow effect and replace the existing color with the one shown below. Move to the second fill and replace the existing gradient with the one shown. Finally, select the stroke and replace the existing color with R=57, G=181, B=74.
Step 29
Let’s continue with the eyes. Pick the Rectangle Tool (M), create two 4 by 8px shapes, and place it as shown in the following image. Fill them with R=0, G=104, B=56, then go to Effect > Stylize > Rounded Corners. Enter a 2px radius, click OK, then go to Effect > Stylize > Drop Shadow. Enter the data shown below and click OK.Step 30
Pick the Pen Tool (P), draw two vertical paths (6px tall), and place them as shown in the following image. Add a 1pt stroke for both of these paths, set the color at R=0, G=104, B=56, and go to the Stroke panel (Window > Stroke). Click on the Round Cap button, then go to Effect > Stylize > Drop Shadow. Enter the data shown below, click OK, then select only the left path. Go to Effect > Warp > Arc, enter the data shown below, click OK, then select the right path. Again, go to Effect > Warp > Arc, enter the data shown below and click OK.Step 31
Pick the Rectangle Tool (M), create a 6 by 4px shape, and place it as shown in the following image. Fill it with R=0, G=104, B=56, then go to Effect > Stylize > Rounded Corners. Enter a 2px radius, click OK, then go to Effect > Stylize > Drop Shadow. Enter the data shown below and click OK.Step 32
Once again, pick the Pen Tool (P), draw two vertical paths (6px tall) and place them as shown. Add a 1pt stroke for both of these paths, set the color at R=0, G=104, B=56, and go to the Stroke panel (Window > Stroke). Click on the Round Cap button, then go to Effect > Stylize > Drop Shadow.Enter the data shown below, click OK, then select only the left path. Go to Effect > Warp > Arc, enter the data shown below, click OK. Now select the right path. Again, go to Effect > Warp > Arc, enter the data shown below and click OK.
Step 33
Select the "Sick" sublayer and make a copy in front. Let’s focus on this fresh sublayer. First, rename it "Angry," then delete the eyes and the mouth components. Again, you need to change the color of the entire face. Down below you have all the info that you need.Step 34
Pick the Rectangle Tool (M), create a 12 by 4px shape, and place it as shown in the following image. Fill it with R=60, G=36, B=21, then go to Effect > Stylize > Rounded Corners. Enter a 2px radius, click OK, then go to Effect > Stylize > Drop Shadow. Enter the data shown below and click OK.Step 35
Let’s continue with the eyes. Pick the Rectangle Tool (M), create two 4 by 8px shapes, and place it as shown in the following image. Fill them with R=60, G=36, B=21, then go to Effect > Stylize > Rounded Corners. Enter a 2px radius, click OK, then go to Effect > Stylize > Drop Shadow. Enter the data shown below and click OK.Step 36
Pick the Pen Tool (P), draw the two paths shown below, and place them as shown in the following image. Add a 1pt stroke for both of these paths, set the color at R=0, G=104, B=56, and go to the Stroke panel (Window > Stroke). Click on the Round Cap button, then go to Effect > Stylize > Drop Shadow. Enter the data shown below and click OK.Step 37
Pick the Rectangle Tool (M), create a 2 by 5px shape, and fill it with R=0, G=104, B=56. Pick the Direct Selection Tool (A), select the bottom anchor points and go to Object > Path > Average. Check Both and click OK. This will turn your rectangle into a pretty sharp triangle. Select it and go to Effect > Stylize > Rounded Corners. Enter a 1px radius, click OK, then make three copies. Rotate them and place them as shown in the final image.Conclusion
The final emoticons icon set is below.Tuesday, September 20, 2011
SOTHOURN: Quick Tip: How to Illustrate 3D Power Cells
SOTHOURN: Quick Tip: How to Illustrate 3D Power Cells: Final Product What You'll Be Creating In the following tutorial you will use blends, blending modes, 3D-modeling and grad...
Sunday, September 11, 2011
Working with 3D Objects and Transparencies to Make a Vector Cola Bottle Design
Final Image Preview
This is what we’re looking to build with this tutorial.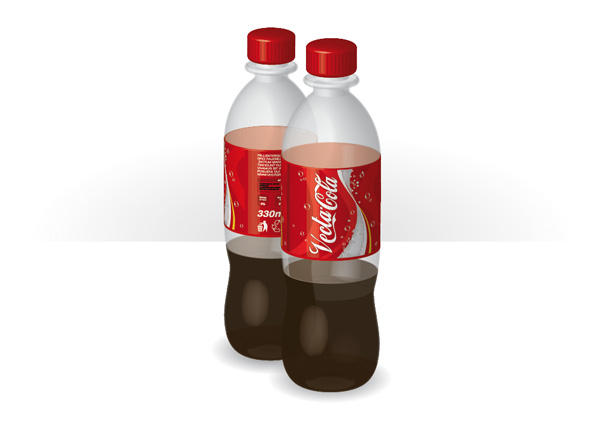
Step 1
We need two symbols for mapping to our final 3D object; a bottle label and some texture for the screw top. Make yours with similar proportions to those shown below and use whatever designs you wish. Group the label components (Objects > Group) to make a label group and also group the top texture components.One thing to bear in mind is the use of gradients within these symbols. Illustrator will rasterize gradients when applying the symbols to 3D surfaces. This is fine and may well give you the desired effect, but in doing so you’ll limit the scaleability of your final object.
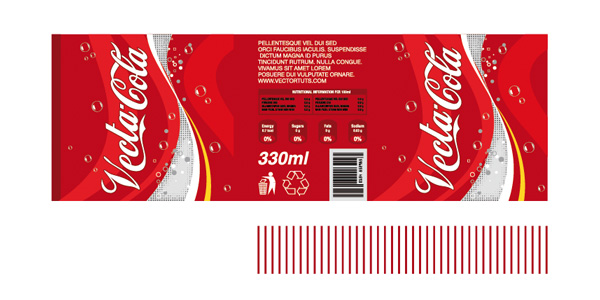
Step 2
Open the symbols panel (Window > Symbols) and drag each of the two groups into the window. Depending upon which version of Illustrator you’re using, you’ll either be presented with the Symbol Options dialogue automatically, or you may have to double-click the symbols once they’re in the panel.Either way, enter a name for each of your two symbols within the Symbol Options dialogue and click OK. You may also find it useful to display the Symbols panel as a list (as shown in the image below), which allows you to see the symbol icons plus their assigned names. Existing instances of the symbols on your artboard may now be deleted.
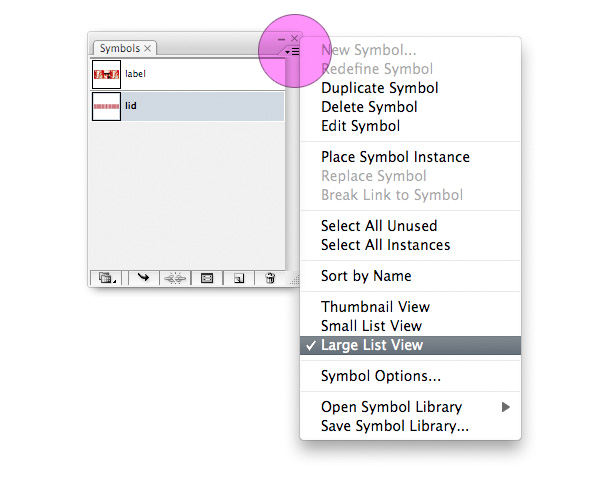
Step 3
I’m now in Outline mode (Command + Y to switch between Preview and Outline) while working with simple vectors, but you can choose which view mode you prefer.Use the various drawing tools to form the shapes needed for a silhouette of a cola bottle. Align them all centrally, but don’t worry if the whole thing isn’t perfectly symmetrical, we’re going to slice it down the middle anyway. There are many approaches to preparing shapes for revolving, this way gives you a reasonable impression of the final form before you applied the 3D effect.
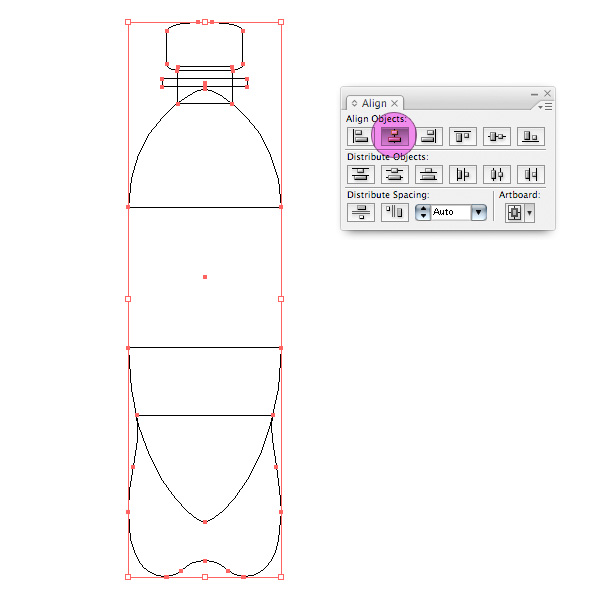
Step 4
Use the Pathfinder tools to join the shapes. Then expand your shapes so you then have one complete object.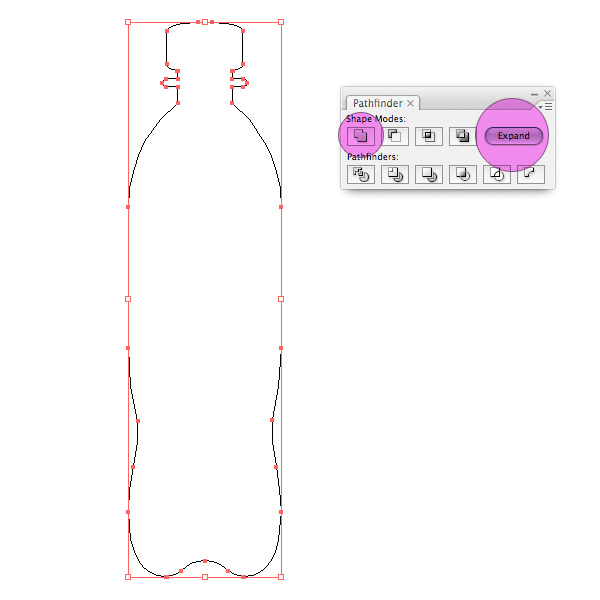
Step 5
Draw a line vertically down the middle of your bottle object. Then align the two together centrally. Now click the Pathfinder’s Divide tool and Expand the result. Your object will have been split neatly in two.Ungroup the two halves (Objects > Ungroup) and delete one of them. It makes little difference which of the two halves you delete; more on this later.
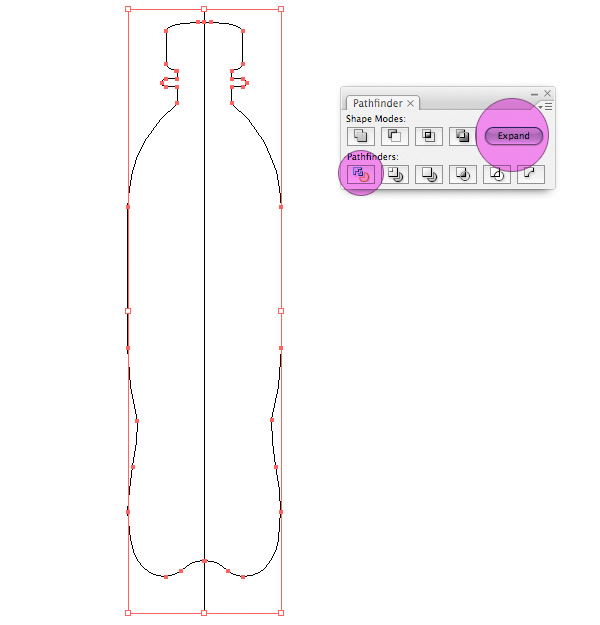
Step 6
We’re going to continue splitting our object up, this time with a series of horizontal lines. What we’re aiming for is a collection of pieces so each area of the bottle can have it’s own color and transparency properties.Start with a line to separate the bottle top from the rest, then one which will begin the label, and another for the plastic underneath the label. Continue with this method until your design matches the image shown below.
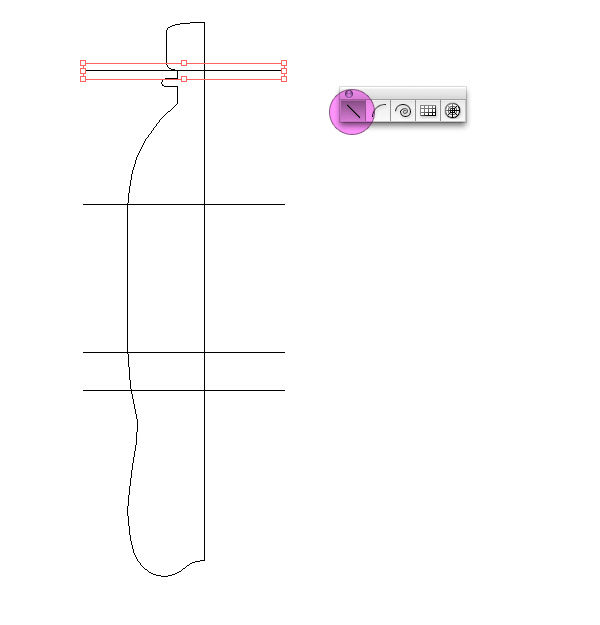
Step 7
Once again we turn to our Pathfinder Tools. You’ve no need to group the horizontal lines together, just select everything on the page and click Divide. Expand your object as you’ve done before. Then ungroup (Object > Ungroup) to release your bottle sections from each other.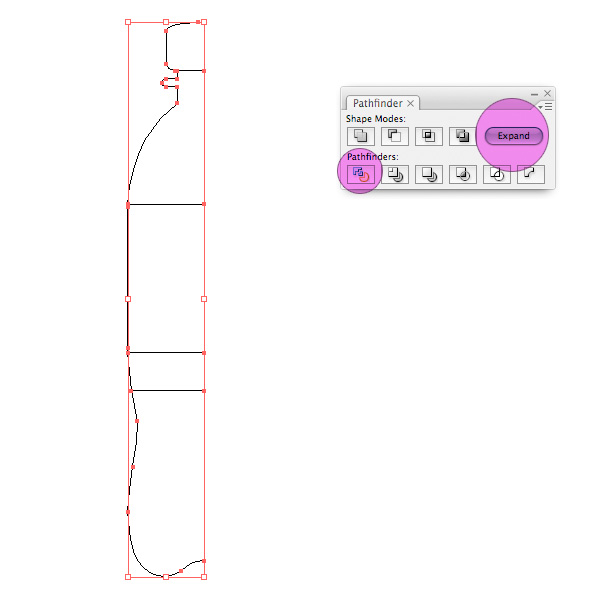
Step 8
Use the Direct Selection Tool to select four of the nodes along the edge of your object (as highlighted below). Then press Delete to remove them. This should leave you with a segmented vector defining the outer edge of half of your bottle.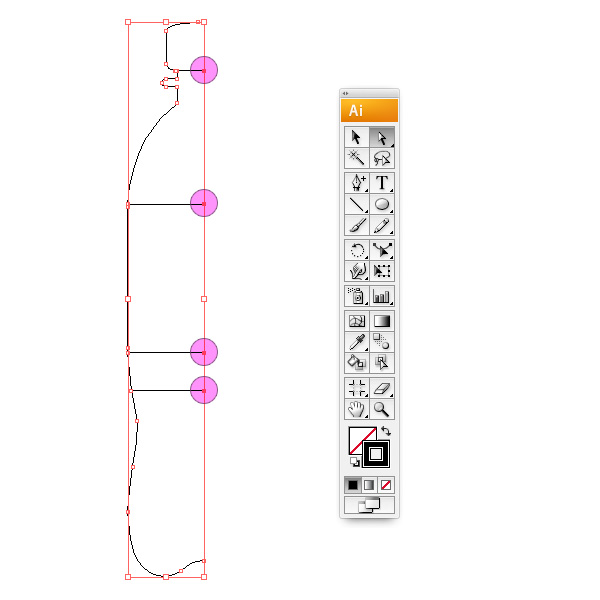
Step 9
If you’re currently working in Outline mode, switch to Preview (Command + Y) so we can determine some colors. Give each of the five bottle sections a color and leave the stroke width at it’s default of 1px (the stroke width will effectively determine the thickness of your bottle’s plastic, you may want to play around with this).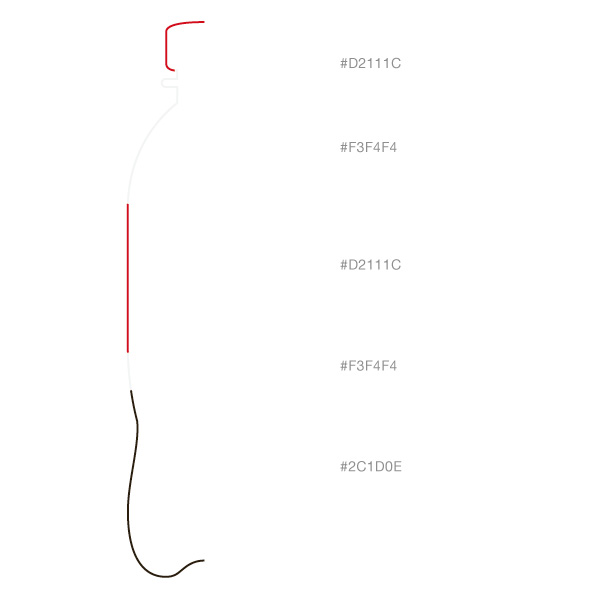
Step 10
Select all your bottle sections and group them together (Object > Group). This is a simple but crucial stage in the 3D revolving process. We want all the sections to be treated as one unit and for the effects to be applied to the group as a whole. Without grouping them, the revolve effect would be applied to each section individually, creating five random 3D objects. Try it for yourself!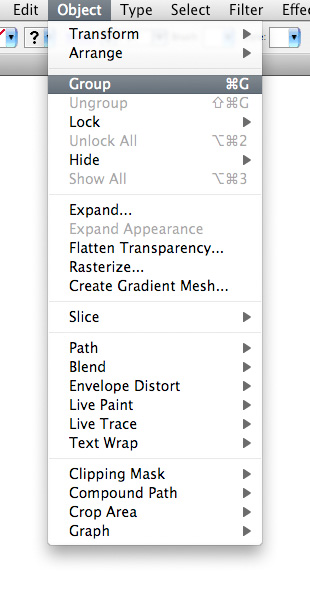
Step 11
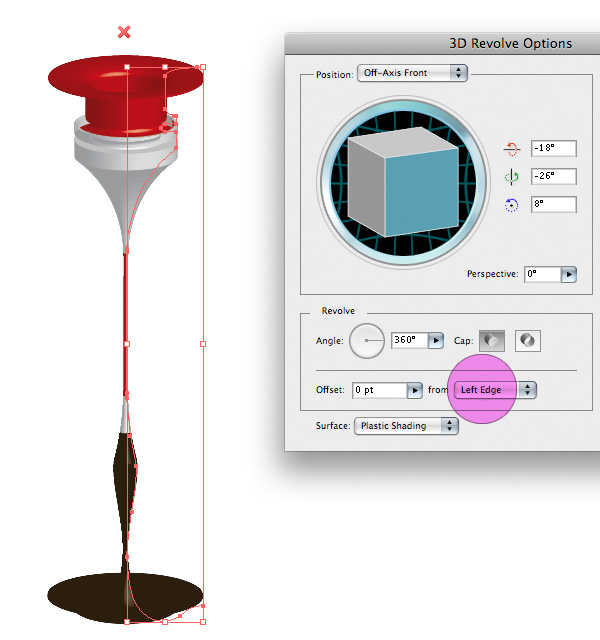
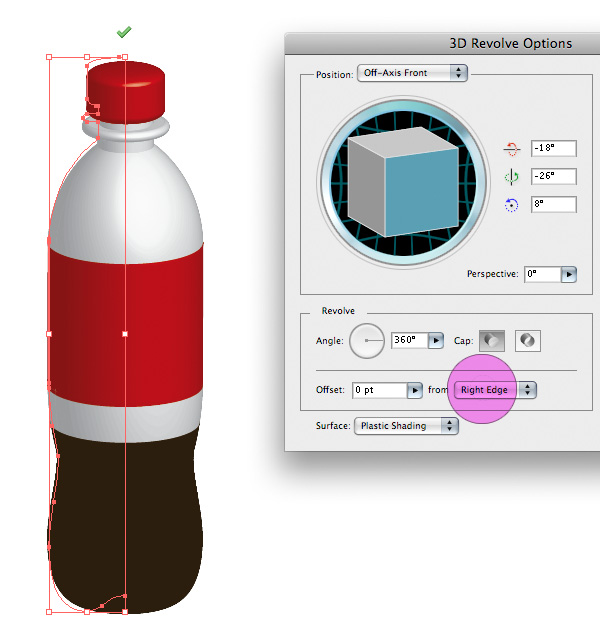
Select your now grouped bottle vectors. Go to Effect > 3D > Revolve and click Preview in the Options dialogue that appears. You’ll be presented with a revolved 3D rendering of your vector, turned 360° around the left edge by default.This brings us back to Step 5 when I mentioned "more on this later." Well later is here now. When I split the whole bottle object into two halves I chose to delete the right hand side, leaving me with the left. If you did the same, your bottle will have rendered as below.
You’ll need to alter the settings so that the object is revolved around the right hand side, as shown in the second image below.
Step 12
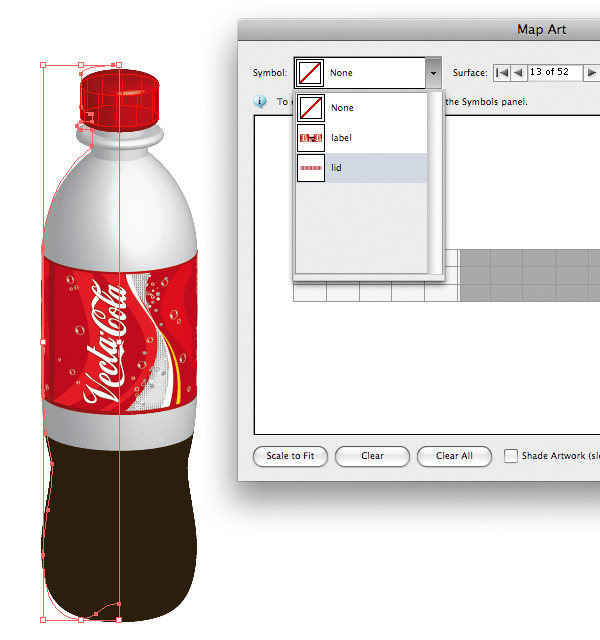
Within the 3D Revolve Options dialogue click on Map Art, which opens the Mapping dialogue. Select the surfaces you need using the surface navigation arrows and map the appropriate symbols to them from the symbols dropdown. There will be a lot of surfaces to choose from with a complex object like this, so it may take a while to find the ones you’re after. This is particularly true when revolving a vector, as surfaces on the inside of your object can also be mapped.Click Shade Artwork then click on OK. Once back in the 3D Options dialogue, play around with the angle, perspective, and lighting (under More Options) until you’re happy with the result. Then click OK.
Step 13
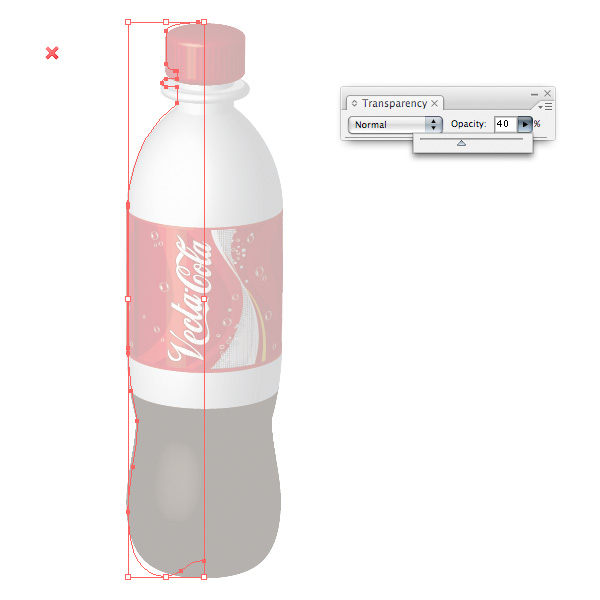
We now have a nice 3D bottle with a label and a bit of lid texture, but the plastic and the cola is opaque; we need to resolve the issue of transparency (here comes the most important part of the tutorial). There are several ways in which you may think to approach this, so I’ll first cross off the incorrect ways, and then demonstrate how it should be done.1. By selecting the 3D bottle and reducing the opacity in the transparency panel the whole object will fade. Furthermore, you won’t even be able to see the reverse side of the object, it will have been treated as a 2D image. This is because when Illustrator renders an object in 3D it first flattens the transparency of that object (see the first image below).
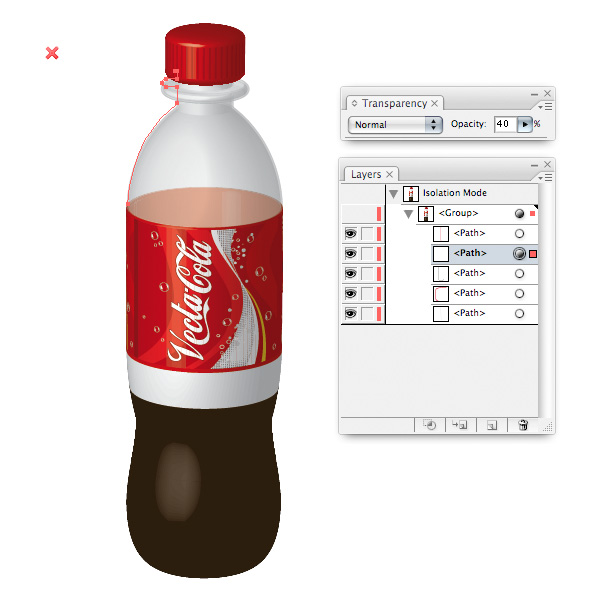
2. Instead we could expand the group in the Layers panel or double click the object to reveal the group elements. By selecting just those we need and altering their opacity we can give our bottle a transparent look (see the second image below). The correct approach! Right? Wrong!
Step 14
Technically we’ve just achieved the look we wanted, but in terms of best practices this method isn’t going to win a gold star. Illustrator has flattened the transparency of the main object (in this case the group of vectors) though now we’ve altered the properties of an object within our group. This transparency isn’t flattened and the effect works.However, imagine that we didn’t have a group. Imagine instead that we’d built a single vector to make a green glass bottle and we also wanted to apply a transparency. We wouldn’t have a group to expand, yet we’d still need to alter the transparency of an element within our vector, so this is where the third correct method comes into play.
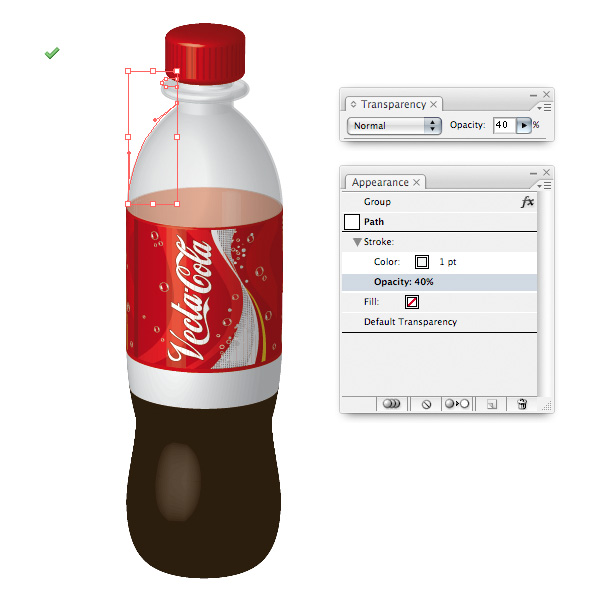
3. Open your Appearance panel (Window > Appearance) and use the Direct Selection tool to click on a vector whose transparency you wish to alter. In the Appearance panel you can now isolate this object’s stroke transparency properties. You do this by clicking on the Stroke attribute and changing the value in the transparency panel. You aren’t altering the properties of the object, but the properties of it’s stroke, which is as far down the properties hierarchy as possible! Guaranteed transparency!
Give the strokes of the plastic sections a Multiply Transparency of 40% and the stroke of the cola section a Multiply transparency of 60%.
Step 15
If you feel the bottle needs to be standing on something, make an ellipse, give it a radial gradient from 50% black to white and scale it vertically, as in the image below. Position it underneath the base of the bottle. Make another (larger) ellipse, give it a radial gradient from 20% black to white. Then Mask (Command + 7) the top half with a rectangle. Position it behind the bottle as a horizon.Unfortunately, Illustrator doesn’t (yet) cater for ambience such as dedicated 3D programs, so you’ll have to fake your own shadow.

Conclusion
There we have it! A transparent 3D plastic cola bottle! Duplicate your final bottle if you want to really demonstrate it’s transparency. Scale it to allow for distance. Bear in mind that when altering the scale of 3D rendered objects (or the stroke width, etc.) your image mapping may need to be reapplied. It’s likely that your surfaces will have been assigned different numbers and that your symbols are attached in different places.
Subscribe to:
Posts (Atom)


